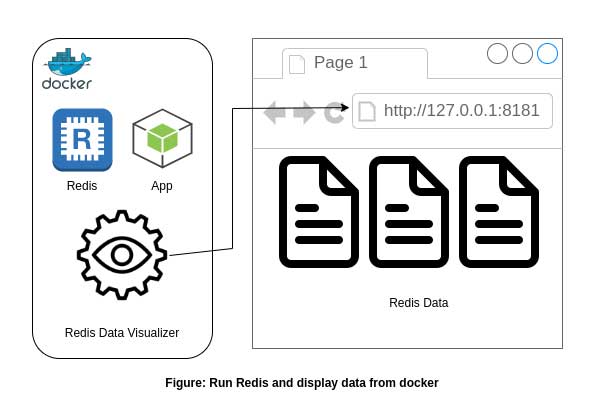
Managing Redis in a local environment can become complicated over time, especially when it requires an OS-independent environment for both development and data visualization.
Fortunately, there are some great tools available to visualize Redis data. In this article, we will explore a containerized solution that can be used to run and visualize Redis databases in a local environment.

Dockerize
We will start by dockerizing Redis with an existing container and using the same docker-compose.yml file to visualize the data. To run Redis, we will use the official Redis image from Docker Hub.
As a starting point, we can add the following code to our docker-compose.yml file:
version: '3.4'
services:
  redis:
    image: redis:6.2-alpine
    restart: always
    env_file:
      - .env
    ports:
      - $REDIS_LOCAL_PORT:$REDIS_DOCKER_PORT
    command: redis-server --save 20 1 --loglevel warning --requirepass $REDIS_PASSWORD
    volumes:
      - redis:/data
volumes:
  redis:
    driver: localCode language: PHP (php)
Please ensure that the REDIS_LOCAL_PORT, REDIS_DOCKER_PORT, and REDIS_PASSWORD variables are already defined in the .env file.
Connect Redis from App
Assuming that we are using the node-redis package in our Node.js application, we can connect to the Redis database from our application with the following code:
import { createClient } from 'redis';
const redisClient = createClient({
  socket: {
    host: process.env.REDIS_HOST,
    port: parseInt(process.env.REDIS_DOCKER_PORT as string, 10)
  },
  password: process.env.REDIS_PASSWORD
});

redisClient.on('error', err => console.error(err));
redisClient.connect();

export { redisClient };Code language: JavaScript (javascript)
Visualize Data
Now let’s move on to visualizing Redis data. One popular community tool for this is Redis Commander. According to their documentation, we can use Redis Commander directly from the console by passing the Redis host, port, and credentials. Another way is to persist the Redis database configuration inside the default.json file.
Redis Commander also provides an image that we can use in our setup. For us, the best approach is to use Redis Commander with our existing docker-compose.yml file.
Let’s update our docker-compose.yml file as follows:
version: '3.4'
services:
  redis:
    image: redis:6.2-alpine
    restart: always
    env_file:
      - .env
    ports:
      - $REDIS_LOCAL_PORT:$REDIS_DOCKER_PORT
    command: redis-server --save 20 1 --loglevel warning --requirepass $REDIS_PASSWORD
    volumes:
      - redis:/data

  redis-commander:
    container_name: redis-commander
    hostname: redis-commander
    image: ghcr.io/joeferner/redis-commander:latest
    restart: always
    environment:
      - REDIS_HOST=$REDIS_HOST
      - REDIS_PASSWORD=$REDIS_PASSWORD
    ports:
      - '8081:8081'
volumes:
  redis:
    driver: localCode language: PHP (php)
Once again, please ensure that both the REDIS_HOST and REDIS_PASSWORD variables are defined in the .env file.
After we spin up our containers, Redis will be running and we can visualize the data from our browser at http://localhost:8081
With this setup, setting up `Redis` in the dev environment is a no-brainer as well as visualizing its data.
You can contact with iXora Solution expert teams for any consultation or coordination from here.

Add a Comment