To create a video on demand(VOD) for broadcast and multiscreen delivery at scale, it needs scalable, reliable, robust transcoding services. In this blog post, you will get to know how to convert any on-demand video file to HLS or MP4 using AWS MediaConvert.
What is AWS MediaConvert?
AWS Elemental MediaConvert is a file-based video transcoding service with broadcast-grade features. Create live stream content for broadcast and multi-screen.
Why AWS Elemental MediaConvert?
AWS Elemental MediaConvert transcodes file-based content into live-stream assets quickly and reliably. Convert content libraries of any size for broadcast and streaming. MediaConvert combines advanced video and audio capabilities with a web services interface and pay-as-you-go pricing. With cloud-based transcoding, you can focus on delivering compelling media experiences and worry less about maintaining video processing infrastructure.
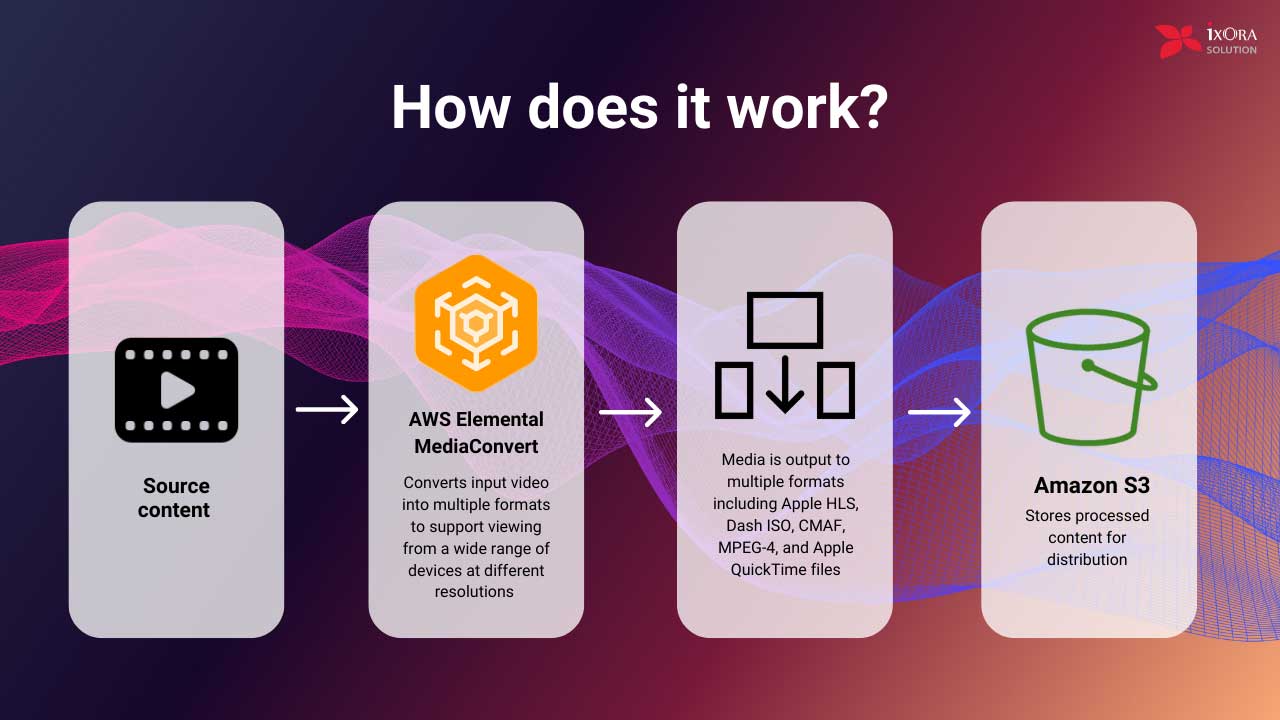
How does it work?

Use cases
- Generate video highlight clips
- Create high-quality video regardless of input
- Deliver 4K HDR media assets
Prerequisites
You’ll need AWS IAM, S3, and MediaConvert for this post. Getting started with Amazon S3 service provides instructions on how to create a bucket in a simple storage service. For this blog, I assume that you have two buckets for the input and output of videos. Let’s dive into the details process.
Video Conversion Process
Step 1: Create IAM role
In AWS IAM console, create a role named as MediaConvertRole with policy as s3 full access.
Step 2: Create Source and Destination Bucket in AWS S3
In AWS S3 console, create two buckets, one for the source bucket and another for the destination bucket. In the source bucket, you will upload your original video and in the destination bucket, AWS MediaConvert will keep the converted video.
Step 3: Create a Job in MediaConvert
A job does the work of transcoding. You specify the name of the file that you want to transcode (the input file), the name that you want MediaConvert to give the transcoded file, the preset that you want MediaConvert to use, and a few other settings. MediaConvert gets the input file from the Amazon S3 source bucket location that you specify in your job input settings, transcodes the file, and saves the transcoded file or files in the output destination bucket location that you specify in the settings of the job output group.
To create a job
- Open the MediaConvert console at https://console.aws.amazon.com/mediaconvert.
- Choose Get started.
- On the Create job page, provide transcode instructions and job settings. Make sure that you pick the same Region for your job and your file storage.
- Choose Create.
In the job settings, you can specify your desired input and output expectation like below code block.
{
"OutputGroups": [
{
"CustomName": "MP4",
"Name": "File Group",
"Outputs": [
{
"ContainerSettings": {
"Container": "MP4",
"Mp4Settings": {}
},
"VideoDescription": {
"CodecSettings": {
"Codec": "H_264",
"H264Settings": {
"Bitrate": 5000000,
"RateControlMode": "CBR"
}
}
},
"AudioDescriptions": [
{
"CodecSettings": {
"Codec": "AAC",
"AacSettings": {
"Bitrate": 96000,
"CodingMode": "CODING_MODE_2_0",
"SampleRate": 48000
}
}
},
{
"AudioSourceName": "Audio Selector 1",
"CodecSettings": {
"Codec": "AAC",
"AacSettings": {
"Bitrate": 160000,
"CodingMode": "CODING_MODE_2_0",
"SampleRate": 48000
}
}
},
{
"AudioSourceName": "Audio Selector 1",
"CodecSettings": {
"Codec": "AAC",
"AacSettings": {
"Bitrate": 160000,
"CodingMode": "CODING_MODE_2_0",
"SampleRate": 48000
}
}
}
],
"NameModifier": "_low"
}
],
"OutputGroupSettings": {
"Type": "FILE_GROUP_SETTINGS",
"FileGroupSettings": {
"Destination": "s3://<MEDIABUCKET>/"
}
}
}
],
"AdAvailOffset": 0,
"Inputs": [
{
"AudioSelectors": {
"Audio Selector 1": {
"Offset": 0,
"DefaultSelection": "DEFAULT",
"ProgramSelection": 1
}
},
"VideoSelector": {
"ColorSpace": "FOLLOW",
"Rotate": "AUTO"
},
"FilterEnable": "AUTO",
"PsiControl": "USE_PSI",
"FilterStrength": 0,
"DeblockFilter": "DISABLED",
"DenoiseFilter": "DISABLED",
"TimecodeSource": "EMBEDDED",
"FileInput": "s3://rodeolabz-us-west-2/vodconsole/VANLIFE.m2ts"
}
]
}
Code language: JSON / JSON with Comments (json)So when you finish your job creation, the job will automatically run by the Mediaconvert. You can see the output from your destination bucket.
You can also automate your job creation and the run process by calling a function in your own environment or your own machine. First, make a JSON file name job.json with the above JSON job setting options. Then run the below code to create and run your job.
def aws_media_convert_job_create():
    sourceS3Bucket = config('MediaConvertBucket')
    sourceS3Key = 'https://test-bucket.s3.amazonaws.com/test.mp4'
    sourceS3 = 's3://'+ sourceS3Bucket + '/' + sourceS3Key
    sourceS3Basename = os.path.splitext(os.path.basename(sourceS3))[0]
    destinationS3 = 's3://' + config('MediaConvertBucket')
    destinationS3basename = os.path.splitext(os.path.basename(destinationS3))[0]
    MediaConvertRoleARN = config('MediaConvertRoleARN')

    region = 'us-east-1'
    result = {}
    jobMetadata = {}

    try:
        print("start media convert job creation")
        client = boto3.client('mediaconvert', region_name=region,
        endpoint_url=MediaConvertEndPoint, verify=False)

        with open('job.json') as json_data:
            jobSettings = json.load(json_data)

        jobSettings['Inputs'][0]['FileInput'] = sourceS3
        S3KeyWatermark =  sourceS3Basename
        jobSettings['OutputGroups'][0]['OutputGroupSettings']['FileGroupSettings']['Destination'] \

            = destinationS3 + '/' + S3KeyWatermark

        response = client.create_job(Role=MediaConvertRoleARN, UserMetadata=jobMetadata,

 Settings=jobSettings)
        return response

    except Exception as e:
        print ('Exception: %s' % e)
        return NoneCode language: PHP (php)
Wrap Up
In this post, I think, you already have gotten a good insight that how to convert any video file to HLS or MP4 format using MediaConvert.
At iXora Solution, we provide cost-optimized, business-friendly cloud services including AWS, Azure, GCP, Digital Ocean, Heroku, etc. To get any kind of cloud services you can reach us info@perf.ixorasolution.com or feel free to contact us.

Add a Comment